I’ve been continuing to do monthly science programs for grades 4-6 at the Burlingame Library. It’s a challenge finding activities that are interesting enough for that age group, but easy and inexpensive enough to coordinate with a class of 25 kids. I’m always a little bit nervous to see how the projects will work, but I am loving the interactions with the kids, who are always enthusiastic and full of ideas. This month’s topic was Water. I had three projects planned: a paper clip challenge, to introduce surface tension; a clay boat challenge, to introduce buoyancy; and an electrolysis project, to demonstrate the composition of water.
I started out with a conversation about what the kids already knew about water: that it’s made up of two hydrogen atoms and one oxygen; that it makes up most of our bodies and the earth’s surface; and all of the different ways we use it, from growing food to generating energy.
Then I had the kids go to the tables, and gave them each a paper clip and a paper bowl half full of water. I told them that their challenge was to get the paper clip to float on the surface. The tools they could use were a tissue or another paper clip. Some of the kids were able to get the paper clip to float by very carefully setting it on the surface of the water with their fingertips. Others lowered the paper clip onto the water with a tissue, which would sink, leaving the paper clip floating. A few kids actually took pieces of cardboard from the tissue box and made little rafts for the paper clip. None of them used the second paper clip idea (you can partially straighten the second paper clip and use it to lower the first one onto the surface), but they all found a solution. I gave a brief explanation about how this was another demonstration of surface tension: the water molecules clinging together create a kind of a “skin” on the top of the water.

Paper clip floating on the water due to surface tension
Their second challenge was to get a ball of Sculpey clay to float on the water. This was by far the thing that excited them the most. It took them a minute or two to come up with the idea of shaping the clay into boats. After that they were all eagerly making Sculpey boats and asking if they could add different components, like paper clip sails. They could have happily spent the whole rest of the class doing that. We discussed the idea of buoyancy, the upward force that the water exerts on objects. I demonstrated buoyancy by pushing a ping pong ball to the bottom of a cup of water, and showing how it shot up to the surface when I let it go. I didn’t get to go into the details of Archimedes’ principle, so I’d like to come back to that in a future class.

Boat made out of Sculpey clay to demonstrate buoyancy
The last part of the class was the electrolysis activity. First, I had to show them the acid/base indicator we were going to use: the juice of a red cabbage (I used a juicer, but you can also just boil the leaves). I demonstrated that when you add vinegar (an acid) to the red cabbage juice, it turns pink, and when you add baking soda (a base) to the juice, it turns green. I explained that we were going to use electricity to split water into hydrogen gas (H+) and hydroxide (OH-).
I gave each student a 9 volt battery, two short pencils that had been sharpened at both ends, and some poster tack. They still had their bowls of water from the previous activities, and I added a small amount of red cabbage juice to each bowl (we found the experiment worked better if the water was only slightly bluish). I also added a spoonful of Epson salt to each bowl, and explained that it make the electrolysis work more effectively.
The biggest challenge the kids found was getting the pencils to adhere to the battery terminals with the poster tack without breaking the pencil tip or preventing the tip from touching the metal of the battery. In some cases, I had the kids remove the poster tack altogether, and just hold the pencils in place while they lowered the other ends into the bowls of water. Once they did that, the water would bubble around the pencil tips. Hydrogen ions (H+) collect at the positive terminal of the battery, making the water more acidic, and turning the cabbage juice pink. Hydroxide (OH-) ions collect at the negative terminal, forming a base, and turning the cabbage juice green.
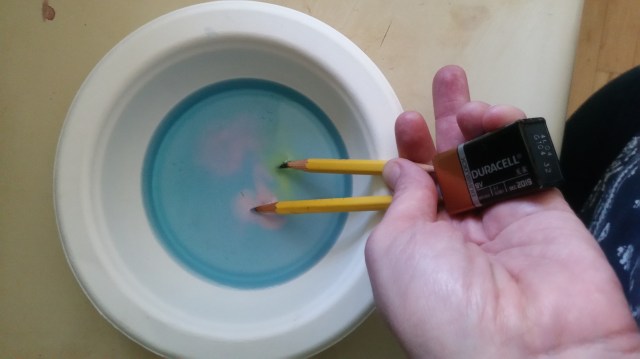
Electrolysis of water with a red cabbage juice pH indicator. The pink color indicates the formation of Hydrogen (H+) ions, while the greenish color indicates Hydroxide (OH-).
It was a fun class overall, although I think it has inspired to do more construction based challenges in the future, since they had so much fun making the boats. I would love any ideas for future classes, so please share them in the comments.

Pingback: Crews_Angelina_Blogshare – Splendid Stories